Showing posts with label DIY. Show all posts

Tuesday, October 9, 2012

Finding Direction

Folks.  Its wedding week J  We’re four days away.  Which means that I probably won’t be posting much (read: at all) this week.  There seems to be a lot of coordinating to do here at the last minute.  In addition, we’re working hard to finish up all those DIYs and printing lots of paper (you won’t believe how much paper ends up being involved with a wedding).  Maybe if there is time you’ll hear from us once more before the wedding, but if not, have no fear – I promise to return after the honeymoon to fill you in on all the juicy details that I haven’t had a chance to share yet (remember I’m using this as somewhat of a journal too so I’ll want to add the rest for when I’m old and can’t remember what games we played at cocktail hour ‘n such).

This was a big weekend.  We crossed so much off the to do list!  And I got to see all of my bridesmaids (each of whom helped us out with a wedding task at some point during the weekend….thanks ladies!)  While there is lots to show you, I thought I’d come back to the teaser I gave you a few weeks back regarding a special project my Uncle Jim was working on.

A loooong time ago, I found a post of an Ash Lawn wedding on one of the blogs I usually read.  It. Was. Gorgeous.  And as a result, I may or may not have stalked hunted  tracked the bride down to ask her some questions about having a wedding at Ash Lawn.  One of the pieces of advice she gave: ‘Take advantage of Ash Lawn’s space.’  It’s a pretty big plantation with lots of gardens and picturesque locations to host your guests.  I took the advice to heart and plan to send you guys all over that place for different wedding events and activities.  But her advice came with a warning: ‘Make it clear where stuff is…like the bathroom.’  She explained that spreading out and using all of Ash Lawn was awesome, but did mean people were a little turned around.  She mentioned that with several folks, during the only 5 minutes she spent with them, they asked ‘Where is the restroom?’ 

With this in mind and an unending stream of ideas placed in front of me via Pinterest, we jumped on board the wedding band wagon of including signs into our special day décor.  First off, I love the way they look – definitely go with our laid back, outside wedding feel.  But it seemed that they would also serve a good purpose: helping our guests get around the grounds of Ash Lawn.  (an aside: I’ve been amazed at the ups and downs that come with planning a wedding; shocked at the level of incompetence of vendors and thrilled by the generosity of some to do all that they can to make your day special.  Lucky for us, the good and helpful surprises have far outweighed the bad! Not only from our friends and family, but complete strangers as well.  We are so lucky.)  In an introduction to Pinterest for my Aunt, my cousin showed off some of the images I had been pinning to my ‘Wedding (maybe)’ board.  My Aunt took notice of the wedding sign trend that was occurring and ever so kindly offered my Uncle’s services to reproduce the gems I was seeing on the interwebs.

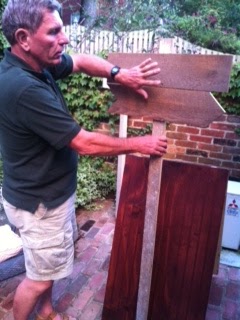
My Uncle is a very talented wood worker.  While I felt a bit guilty about accepting the help, I was giddy at the thought of having the beautiful signs I had always envisioned directing our guests about the wedding.  He assured us it would be no problem and had mock ups (based on my pins!) within a week.  We made some selections and within no time, he delivered the posts and arrows for the seven signs I requested.  (I know…way to take advantage of someone when they offer you help….)  And they look awesome!

This past weekend Kels trucked up from Rich-mund to help us finish them off with some stenciling J  Luckily Saturday included some beautiful weather so we headed out to the circle to write out all the signs.  We needed an arrow for each of the below:


Ceremony
Cocktails (2)
Corn Hole
Kubb
Cheese
Reception
Restrooms (2)
Cows (wouldn’t want you guys to miss out on the cows!)
Chile (you know to help you get your bearings)
Then three larger signs to 1) direct cars at the turn for Ash Lawn 2) send you guys down the right path to the ceremony  and 3) help you find your seat.  We are so happy with how they turned out!  They’re going to look even better once we have them mounted on their posts and sticking in the ground.  Hopefully you guys will take note and use them to help find your way to all sorts of important things (like the cheese table and corn hole sets!).

Friday, October 5, 2012

Bathroom Baskets! - Guest Post

Hi all! BM Jess here, as requested by the bride to give y’all a little insight into some of the details that you’ll see on the day of the wedding :)

A few months ago Audrey reached out for some help with one of those wedding details that you could call a trend if you’d like, but one that’s become more and more popular and shows no sign of disappearing soon for one very specific reason: this one actually makes a lot of sense. I am referring here to Bathroom Baskets, which are exactly what they sound like: baskets placed in the bathroom and filled with various goodies and toiletries for wedding guests to make use of throughout the night.

I know all of the girls reading this immediately went “oh my goodness, SUCH a good thing to have” and all of the guys went “huh?”, but let me tell you, with a few minutes of brainstorming you can pretty quickly think of some essentials for both girls and guys that you’d want access to throughout a long night of partying. Audrey, Javier and I thought of an initial list of must-haves, but I first got true inspiration walking into the Mecca of cheap, travel-size toiletries: Dollar Tree. Needless to say, my list of “must-haves” grew very quickly and I soon had an absurd amount of things no wedding guest could possibly live without... After rounding out the purchases with a couple other stores and a trip to Michael’s (for the essential basket component of the bathroom baskets), we ended up with the lovelies you see below. So if you happen to need breath mints, ibuprofen, tissues, hair spray, cough drops, or any number of other essentials, make sure to swing by the bathrooms and see what’s we have :)

While there, you’ll also see the second part of the bathroom decorations – a bathroom poster giving you some details about Audrey’s and Javier’s oh-so-fabulous honeymoon in Chile! A&J thought it would be fun to add a poster with trivia or facts about the two of them to the backs of the stalls in the bathrooms, and this idea evolved over time into giving the guests a glimpse into their trip to Chile. You can see a preview here, but again, make sure you take a minute during your trips to the restroom to read up on some of the sites they’ll be visiting and some Spanish vocab to know!
Not to over share, but I'm a lady that takes a lot of trips to the bathroom (big water drinker).  So this special addition to make our guests feel more comfortable in the facilities was an important one to me.  Jess did such an amazing job with them!  Ladies and gents, I think you'll find just about anything you could possibly need (hygiene wise at least) in these baskets.  They are filled to the brim!  And the Chile fliers are gorgeous and really interesting to read (its nice to have stuff to read in the bathroom...).  Looking forward to my first trip to what will be our homey bathroom at Ash Lawn ;)  Thanks Jess!

Wednesday, October 3, 2012

Take your seat for the show!

So I might have told you guys (or maybe not, I forget who I tell what to these days…) that instead of using numbers to mark our tables, Javier and I decided a while back to ‘name’ our tables after the plays/musicals we saw during our courtship (since that was what we loved, well love, to do together).  We thought it was another fun detail we could add to the day to make it a little more special; a little more us.  So instead of sitting at ‘Table 8’ our guests would sit at the ‘Design for Living’ table.  Sure, it’s a little more complicated, but also more fun J

This idea started a while back, but took some thought to really flush out, starting with how to display or identify which plays were assigned what tables.  Now, I’ll admit it, I’m a bit of a saver.  I still have everything from the first Valentine Javs ever gave me (it was homemade) to the White House Christmas brochure I picked up on one of our first dates.  Believe it or not, we still have a ticket and/or playbill from just about every show we’ve seen together.  I knew these artifacts somehow held the key, but how to display them on our tables so they were easily spotted by our searching guests?  Luckily, I’ve been following a million most of some industry blogs looking for good ideas to incorporate into our day.  Finally, one day, I spotted a look I liked: wine bottles.  We would remove the front cover of all the playbills we had saved and glue them to wine bottles to elegantly display on each table.

attempting to soak bottles (which is all
mom said she did) but man did i struggle
Luckily, Mom and Dad are regulars at a restaurant down the street in Williamsburg.  Their tendency to want to watch baseball when they come in combined with mom’s special drink order (they make a ‘Barb’ martini for her every time) resulted in them getting to know most of the bartenders.  While I’m sure we would have ingested the needed wine to retrieve so many bottles over the course of the year, chances are they would have be different shapes and colors.  Instead, Mom asked her buddy bartenders if they might save their discarded house wine bottles for her to take away when she came in.  We had 30+ bottles in no time!  As if that wasn’t enough, my incredible mother painstakingly undertook the task of scraping all the labels off for me as well.  (I attempted with minimal success.)

Now I had clean and clear wine bottles, a bunch of playbills and a hazy idea.  Javier and I started by narrowing down our plays to just 12 (the number of tables we needed for dinner).  We tried to consider the look of the playbills, significance of the play, theater, or date and our enjoyment of the show to determine what to use.  We ended up with these:

The Alchemist (Felipe acted in this show!)
Avenue Q
Bill Cosby (Kennedy Center performance)
Blackbird (one of our first dates at our neighborhood theater Studio Theatre!)
Chicago
Design for Living
Jersey Boys
Les Miserables
Men Fake Foreplay
The Sound of Music (Wolftrap live performance)
West Side Story (Javs first trip to NYC!)

Then I set to work.  I started by making color copies of our saved playbills.  (You can actually see our finger prints on some of them if you look closely).  Then I trimmed up the copies and Mod Podged them to the wine bottles.  It took a few attempts (luckily I had extra bottles and bills) to figure out the right size, but I was actually really happy with how they turned out J  Super colorful and easy to see! 

Since the playbills only took up 2/3 of the bottle, I started to wonder what do to with the other side.  I had picked up some chalkboard paint on one of my bazillion trips to Michael’s, figuring I’d use it for some wedding project or another.  I decided to tape off a rectangle and paint the other side of the bottle with chalkboard paint, just to see how it looked. 

I’m a food person.  (I think we’ve talked about this.)  And love when I see menus displayed or available at the weddings I attend.  Its fun to see the fancy description of what you’re about to eat.  It always gets me pumped (not that I needed much help) for dinner.  I knew I wanted our guests to know the menu for our family style dinner at our wedding too, but had been debating how to display it?  A big board on an easel outside of the pavilion? Print individual menu cards for each place? Or maybe a couple per table?  In the end, my wine bottles gave me the answer.  I could use the chalkboard side of each bottle to write out our dinner menu to display on each table!

Two birds. One stone.
Next project will be escort cards tickets, for our guests to pick up to learn their table number show!

Tuesday, July 10, 2012

Lights, camera, action!

Hello, lovely readers.  Audrey has been steadily blogging away, letting you know about some of her our accomplishments, so I figured I'd give you a little update.  Audrey and I had talked about things that we'd ideally want at our wedding, and one of them was a videographer.  At least I was hoping to possibly have one to at least record the ceremony and maybe some of the reception.  You know, cuz we won't be able to see it the way one of our guests might.  But we also knew that it would potentially cost a lot of money, and we definitely wanted the timelessness of clean photography.  So we cast videography aside and decided that photographs would be more than fine.

But through some blog reading, both Audrey and I discovered the company StoryMix.  We both had learned about this crowdsource-leveraging company that basically lets you film the footage but then edits it for you.  We had thought it was a cool idea, but even still, it would cost about $500 to get, and it just seemed like too much for a fancy extra addition.  But when I stumbled upon a Giveaway Contest I felt like I had to enter.  There were only 75 entries with a day to go, and you could enter 31 times!  So stuffing the ballot is exactly what I did, and I got my name in there 31 times.  So with approximately 125 entries (across 83 entrants), I felt like the odds were ever in my favor.  And they were!  My name got drawn to win one of the videography packages!
And that is where you all come in!  If you download the WeddingMix app for your smartphone, you can be our videographer!  Audrey and I will get to see the wedding from all the various perspectives of our friends and relatives who are at the wedding.  Or at least the ones who download the app and share clips with us.  So stay tuned for more information about downloading the app so that you can take some fun videos.  Now we'll get to peruse our pictures and watch some fun memories on video, too!

Friday, May 25, 2012

Save the Date! (Part III)

With Save the Dates 1) designed 2) printed and 3)envelopes in hand, you'd think the hardest part was behind us.  You'd think. 

**Advice Alert** Start sending Christmas/Holiday cards.

If you aren't married yet, but you think that you may get married some day, start sending holiday cards.  (If you're already married, you may send holiday cards too!)  First off, its so fun getting Christmas cards that it'd be nice to spread the love.  Second, people are so excited to get your card that the excitement actually travels around the world (or across state lines) to fill you with the excitement of that card so you get to enjoy it too! (no joke!) Third (and the most relevant for this post) it means you'll start collecting and keeping up with your friends' addresses so that when you need to send them something really important like an edible arrangement, Halloween card or Save the Date! you totally already have their address!

Despite the fact that Javs and I do send cards during the festive season, we still struggled  to get all the names and addresses needed for the Save the Dates (cause people move *cough* the Bottoms *cough* and cousins go off to college and some of your friends who are dating live together and some of them don't and some you only know one address for and therefore need to find the other.....)  Just trust me, its a lot.  So start now!  Send cards!

This was also the first time we had to re-address those lists that we made waaaay back in October.  There was a Staples family list, a Cabezas family list and an Aud & Javs list and we needed to decide who exactly would be receiving these fabulous Save the Dates off of those lists.....but I'm saving 'the guest list' for another post.....

I'm not sure if you can see it, but they all
have a scripted 'Love' included on them.
Lets get back to the fun stuff :)  Yes another trendy idea on the wedding scene today is to use your stamps to make a statement.  Brides are tracking down vintage stamps, or getting  $.05 or $.20 stamps so they can use a bunch of them to kind of decorate their envelopes.  They do look really cool, but as I've said, I was officially in head down, rush mode.  So Javs and I browsed the current stamps available at the good ole post office so that I could run grab what we needed at lunch.  The USPS does have some 'wedding' stamps that are (I think) always available, but they tend to be more traditional and didn't really fit our feel.  we wanted something fun!  something happy :)  Something that screamed love! and joy! (wow, a lot of pressure for a stamp)  We settled on these bad boys.  They were romantic, but whimsical and felt more consistent with what our guests would see when they opened up their envelope.  (we did not use the dove stamps....yes I bought extra sheets so that we didn't have to use the dove ones because I thought they were too traditional and not colorful....brides are crazy, what can I say.)

Now to get all those complete and accurate addresses onto the envelopes that were prepared with these delightful, colorful stamps....we considered doing labels, but Mrs. Cabezas had kindly offered to address them.  Javier and I knew that she had beautiful, script-like handwriting, but were worried about the time it would take to have her address 100+ envelopes.  While we're making some more modern or less traditionally decisions regarding the wedding elsewhere, I'll totally admit that I'm a sucker for a beautifully, hand addressed envelope.  Maybe even more today, in our world of emails and texts and facebook messages, its truly beautiful to hold in hand, that time and effort. Labels would have been absolutely fine!  It just felt the right amount of special for the wedding to have them addressed by hand!  Needless to say, we took her up on her offer!  She continued to tell us it wasn't bad, but I can only imagine the hand cramps after writing so many!  (not to mention, she wrote the return address on all the backs of the envelopes too!)  I thought they turned out so beautiful and we are eternally grateful for all of her hard work!

Woohoo!  Lets get these out the door!  Dedicated MOH, Kelsey Bottoms, came over for an early morning stuffing session (and was even together enough to document the event).  We had a pretty good system going, Kels stuffed and sealed, I read every line of the address to Javs, he cross referenced our master list to ensure names and addresses were correct.  We did not put a 'Yes' in that Save the Date column until everything had been confirmed.  (I'll tell you now - there will be some mistakes - just be ready for it.  We caught a lot of them during this session...wrong zip code or misspelled name...but you're probably still going to get some returned to you, not a big deal!  We had 4 returned - but one was Ando's that we were attempting to send to Australia without writing 'Australia' on it, so it totally doesn't count)

This is our postwoman!
We were planning a trip down to the post office (especially b/c I had heard through my blogs that the post office prefers you to sort and bundle your envelopes when you're sending such a bulk out), but as we were discussing our plans, heard the clear *clink* of our own mail box opening and closing!  Javs rushed out to ask our postman (actually postwoman, we learned!) the best way to handle our outgoing mail.  She was super nice and said she'd be happy to take the whole lot for us!  She even gave a sweet smile for our silly picture.  We certainly had some stragglers (addresses we were still waiting on, or envelopes that were addressed wrong on the first go-round)  but our save the dates were in the mail!

Tuesday, May 22, 2012

Save the Date! (Part II)

Javs didn't love the first picture I sent (the one in my quick/at work mock-up) because it didn't really show our faces and he thought it might be just a bit off for a Save the Date.  I eventually agreed.  And then it was so easy to choose which photo we did want to use after that - it seems silly to me (now) I didn't go with it in the first place!  It was the 'us' (don't you guys get sick of me saying that...) that I was hoping would be captured during our session with Andrea and Brian.  (no we don't always just flop on our sofa...) but we looked happy and comfortable.  It wasn't posed and it felt real.

We mocked up a couple of options in photoshop (him taking over when I got too frustrated and me asking for the computer back when I thought he was working too slowly.  Its sounds chaotic, but I think we were a pretty good team!)  and sent them to our family and wedding party for some opinions.  Luckily, their favorite was almost unanimous!  We had our front and back ready!  Now, to print them....

Thank goodness, in addition to save the date sites, I had also been keeping track of some printing sites (just in case!) that were recommended on my wedding blogsl.  We did a little price comparison and looked at different paper options with each place.  In the end, it was http://www.catprint.com/ that was the winner.  They were super reasonably priced and had good reviews (although not a ton of them).  We were also excited that they would send a free hard copy of our design for approval before the big print job!

**Here is where Javier and I made a mistake**
I swear I didn't want to open the box without Javs...
I will say that the Catprint customer service staff was super helpful (although not always as quick as I wanted them to be).  We sent off our designs, feeling the early light of accomplishment brushing our faces...only to have their team inform us that our files were not the right size and we would more than likely have some stuff cut off in the print if we stuck with what we had sent.  Hmm...Here started days of going back and forth with new files, many phone calls, and hesitancy from Catprint until they finally thought our design would print well. (by the way, I think it really was user error on our part - as I've mentioned, we were not photoshop experts)  Now, here comes the mistake: we were feeling some pressure to get these printed and out the door and therefore decided to fore go the hard copy approval before having our 100+ save the dates printed. They sent us a digital copy, but since the hard copy would take a few days to arrive and then we'd have to approve it before they even began printing, we said yes to the digital copy so they'd just hurry up and hit PRINT!

but he told me too!
You guys have seen them - they are, overall, very pretty.  We've gotten lots of compliments about them and I'm completely reassured when I hear people say how well they think the cards fit our style.  (YAY!)  But the truth is, if I had gotten this version as a hard copy, I definitely would have made some changes before having 100+ printed.  Oh well, I was pretty sad about it for a day (crazily contemplated having them all reprinted), but then realized it was really no big deal and I had to get over it. 
so i did :)
It is however a good example of the 'getting so caught up in it' that you kind of lose your senses a bit.  We were talking a matter of days that approving a hard copy might have added as far as getting these out to our guests.  But in that moment, I was so panicked and focused on getting them out exactly 6 months  before the wedding, that we rushed and made a mistake.

Lesson learned though: 1) start invitation stuff earlier (Javs and I have already started looking!) 2) two days will not matter, check and double check to make sure its what you want 3) even if its not perfect, its probably just you that is freaking out about it - everyone else is going to say 'they were lovely' and get on with their lives....

Great!  Now we have these beautifully designed, perfectly printed Save the Dates :)  but we got to get them to folks....we need envelopes.  So we spent a quick, ok reasonable, few hours in Paper Source looking at all the different paper options we had for the envelopes.  My goodness, I could get lost looking at paper in that store but I'll spare you the play by play recap of our time there.  Know that we pulled a bunch of envelopes we thought fit our 'colors,'  did a couple rounds of veto-ing, tried a few pen options on each and ended up buying 3 different colors so that we could decide later.  (Another mini mistake - we didn't have our physical Save the Dates yet and wanted to see how they would actually look with each envelope before we decided - so wait til you have your save the dates in hand to go envelope shopping -ooops!)

In the end we decided that we wanted to stick with the brown tones (our Save the Date was going to have a sepia finish).  We figured there would be other opportunities to bring in color and it just felt more consistent with what we were going with on the cards.  This ended up being a decision we were really happy with later.... :)

Monday, May 21, 2012

Save the Date! (Part I)

Javs is supposed to be blogging about our amazing find for a rehearsal dinner spot, but since he is slacking busy, I'll do some catching up on my blog posts!  Updating you guys on our Save the Dates is way overdue, but since you've hopefully received yours by now (except for Jo) its not like we've been holding you in total suspense.  But for the sake of documentation and honest divulging - I'll give the back ground on the birth of these babies.

Since google docs is blocked at my place of work(probably thanks to emma *cough*cough*) I've been creating draft emails to myself in gmail and storing wedding data in there.  My 'Save the Date' email draft is pretty out of control with links to all the sites I was looking to explore when it came to save the date time.  While I browsed these a bit, I'll completely admit that our engagement pictures really put the brakes on the idea of ordering an already-designed or templated save the date.  Javier and I weren't sure we were even going to use a picture for our save the date, but after looking through our favorite pictures from the e-session, I knew that there were a few I would be excited to share with our attendees via the save the dates.  As you read, I loved some of the pictures Andrea and Brian captured of me and Javs on our sofa at home and threw together this draft early in February (in about 90 seconds at my desk at work).  And so the idea to design our own save the dates began.

Kelsey kindly allowed us to use her photoshop and away we went.  Which is to say that we progressed ever so slowly through the maze of photoshop with little knowledge and less patience.  I must have googled 'how do you ____ in photoshop' about 12982743 times while working on the design of these bad boys.  But google (per usual) was super helpful and so we stumbled along creating a few options, tweaking spacing, fonts, colors, etc.  I'll be totally honest here; I really do love a lot about our save the dates, but I know I would still be tweaking these details, rearranging and shifting today if there hadn't been some pressure to get these out the door.  I guess its the blessing and curse of designing your own stuff - you can create it to be exactly how you want it, but its you that also has to declare it 'done.'  If you have even the slightly drop of perfectionism in you, that can be hard to do (it was something I struggled with a great deal).

In addition to designing our own, we also needed to make a decision on a fairly trendy save the date idea: to magnet or not?  There are some obvious advantages of sending out save the dates that are also magnets. The number one being that people will immediately stick it on their frig making it less likely to be lost in the shuffle.  This ritual leads to the other advantages; people will look at your date over and over (cause everyone goes in the frig) making it more likely that they will actually remember the date of your wedding, repeatedly (cause, lets face it - you probably go in there a lot) seeing the couples' smiling faces will build excitement and anticipation for the day of the wedding, and lastly, the joy that one can find only within the frig will begin to be associated with the couple making it more likely that the attendee will also feel joyous at the wedding.

While these advantages were appealing, there were some advantages to non-magnet save the dates that we wanted to consider as well; they are cheaper, they can be two sided! and your guests 98.73% of the time are going to stick it on the frig (using a magnet they already own) anyway so you'll absorb all the advantages listed above.  Sold.  We would go non-magnet and include a backside to our save the date.  In the end, this was extremely helpful because we could include some encouragement for our guests to book rooms for the, now football, weekend in Cville.  (book your rooms people!)  So we added 'back design' to our tasks to complete using photoshop and pressed on.

Friday, January 20, 2012

something next to normal

Wedding trends: they’re everywhere. And they’re powerful. I find myself totally succumbing to some of the current wedding trends without explanation. Like, why am I so much more attracted to this instead of that? But I am. I don’t want that, I want this (I really do)!


this = mason jar : that = a regular vase


A trend right now in engagement shots seems to be signage. Evidence:

Now, Javs is not the keenest on the contrived photo. It was actually what we looked at most when selecting our photographer – we wanted someone who worked hard to catch the natural moments of the day. Now engagement photos lend themselves to a certain amount of illusion. (How often do you just sit around and smile at each other for that long anyways…) but I did think there were some elements that we could work on to help make our pictures more ‘natural’ (or as natural as they could be).

I think one thing to help was asking our photographers to come to our home to take some pictures. Outside of Cvent walls, its where I spend the majority of my time and certainly where we spend the majority of our time together. Maybe our at home (literally) setting will help put us at ease!

Now, I’ll admit that I may have fallen a bit for the engagement photo signage trend. I do think its kind of fun to put that little thought bubble or caption to a photo that helps deliver its message. You know, like those rare episodes were the coyote would hold up a sign (because he never spoke) to let you know what was on his mind. I loved those episodes - I momentary glimpse into the soul of an otherwise silent coyote. (okay – slightly dramatic, but you get it). But when I talked to Javs about ‘props’ for our session he was more than skeptical. (Maybe it was my use of the word ‘props’ that contradicted so clearly with his ‘non-contrived’ hopes.) But I kept thinking that if I could find something that was really us and really gave a glimpse into whatever it is we’re trying to say with our engagement pictures that he might be on board because it wouldn’t be contrived.

Enter Next to Normal.

Next to Normal is a musical that Javs and I went to see on one of our early dates. It was just getting started then and hadn’t made it to Broadway yet. We did get to see the ‘original’ cast because they were the only cast…it had just started traveling. I learned later that Javs was all nervous because it was a new show and he wanted it to be good (cause he was still trying to impress me) yatta, yatta. Well, it was better than good. We both came out at intermission bubbling over with excitement about how much we were loving it; the songs, the actors, the whole show = awesome. (Apparently critics agree b/c it went on to win three tonys).

The love song in the show (its played and reprised several times) is called ‘Perfect for you’ http://www.youtube.com/watch?v=ZGGeJTH7zN4 – Listen to it.

In one of the reprises there is a line (one of my favorites),

‘Cause crazy is perfect and f***ed up is perfect so I will be perfect, perfect for you’

I love it. It kind of says it all…and I’ve already expressed wanting this written somewhere at our wedding!…but agreed with Javs that having ‘f***ed up’ written (even if it is in a pretty frame) at your wedding is probably not the best idea. Instead, I suggested using some other lyrics to make a ‘sign’ for our engagement session – javs was in!

I think the song can have a myriad of meanings (probably different for different people). I won’t go into all the meanings it has for me, but its certainly something that makes me think of Javs and what we have been (and will be) for each other. And its something we often walk around our house singing to each other, “perfect for you…I could be perfect for youuuuu.’

***DIY Alert** (my first!)I used frames that I already had - just took the pictures and glass out. Then printed off the 'perfect for you' and 'i could be' in Bradly Hand ITC font (just good ole word font). I bought some awesome notecards from papyrus (because you can never have enough notecards from papyrus) and cause we haven't completely decided on our colors - so I didn't want to get a ton of orange paper (that we wouldn't end up using) where as with notecards - I knew I could use them no matter what (thank yous!). Then I traced (several times) the letters I had printed out until they were some what etched into the card. I went back over the etching with the pen to really darken it out, but I think they didn't turn out half bad. (Javs wanted me to just free hand them onto the cards...has he seen my handwriting? - NO)

And so were born – our signs :) So we’re taking the trend, but making it us. We’ll give em a try tomorrow and see. If you never spot them in the pictures I (hopefully) use from our session tomorrow....well then you know they were a bust. Here's hoping we're trendy enough to pull off the trend :)

Oh - and the chafing gel did not turn my face blue (sorry - those pictures would have been hilarious)